Ubuntu - OpenVAS 7 installieren, konfigurieren und Netzwerke auf Sicherheitslücken testen
Geschrieben von Guenny amOpen Vulnerability Assessment System (OpenVAS) ist das OpenSource Tool, wenn es um die Sicherheit im Netzwerk geht. Die Toolsammlung welche aus Nessus hervorgegangen ist, bietet alles was für Schwachstellen-Scanning und Schwachstellen-Management benötigt wird.
OpenVAS ist vor einiger Zeit in Version 7 erschienen, ich möchte heute zeigen, wie die aktuellen Pakete Scanner, Manager, CLI und GUI (Greenbone) auf einem Ubuntu System (14.04 LTS) installiert werden.
OpenVAS lässt sich alternativ auch über die Paketverwaltung (apt-get) installieren.

OpenVAS 7 auf einem Ubuntu System installieren
1. Benötigte Pakete installieren
sudo apt-get install nsis alien texlive-latex-extra libqt4-dev g++ libmicrohttpd-dev\
libxml2-dev libxslt1-dev libsqlite3-dev doxygen sqlfairy xmltoman sqlite3 \
gcc pkg-config libssh-dev libgnutls-dev libglib2.0-devlibpcap-dev namp \
libgpgme11-dev uuid-dev bison libksba-dev zlib1g-dev libldap2-dev xsltprocv \
libldap2-dev autoconf cmake
2. Aktuelle OpenVAS Pakete herunterladen
wget http://wald.intevation.org/frs/download.php/1722/openvas-libraries-7.0.6.tar.gz
wget http://wald.intevation.org/frs/download.php/1857/openvas-scanner-4.0.5.tar.gz
wget http://wald.intevation.org/frs/download.php/1849/openvas-manager-5.0.7.tar.gz
wget http://wald.intevation.org/frs/download.php/1799/greenbone-security-assistant-5.0.4.tar.gz
wget http://wald.intevation.org/frs/download.php/1803/openvas-cli-1.3.1.tar.gz
3. OpenVAS 7 Pakete entpacken
sudo tar zxvf openvas-*
sudo tar zxvf greenbone*
4. OpenVAS Libraries installieren
Es ist zwingend nötig die Libraries als erstes zu installieren, ansonsten erhaltet ihr Fehlermeldungen, die eine weitere Installation verhindern.
cd openvas-libraries-7.0.6
sudo mkdir source
cd source
sudo cmake ..
sudo make
sudo make install
cd
5. OpenVAS Manager installieren
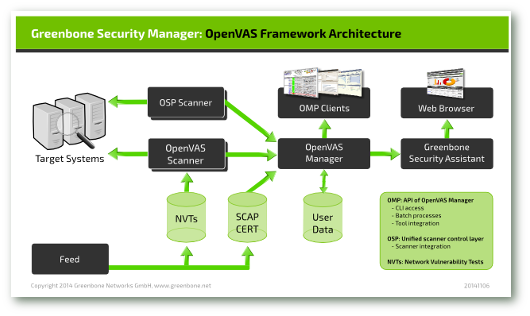
Der Manager steuert und verwaltet die einzelnen Scans. Außerdem ist er für die Benutzerverwaltung und die Datenbank zuständig.
cd openvas-manager-5.0.7
sudo mkdir source
cd source
sudo cmake ..
sudo make
sudo make install
cd
6. OpenVAS Scanner installieren
Der Scanner bildet die zentrale Komponente des Systems, er ist für die Network Vulnerabilty Tests (NVTs) zuständig.
cd openvas-scanner-4.0.5
sudo mkdir source
cd source
sudo cmake ..
sudo make
sudo make install
cd
7. OpenVAS CLI installieren
Für diejenigen, die OpenVAS nicht über die Oberfläche bedienen möchten, bietet das Kommandozeilen Tool omp die richtige Lösung für Batch Prozesse.
cd openvas-cli-1.3.1
sudo mkdir source
cd source
sudo cmake ..
sudo make
sudo make install
cd
8. Greenbone Security Assistant (GSA) Oberfläche installieren
Der GSA ist einer kleiner Webserver der über HTTP oder HTTPS das Konfigurieren und Ausführen von Scanvorgängen erlaubt. Die Oberfläche ist für den OpenVAS Einsteiger sicherlich die bessere Lösung, um sich mit der Toolsammlung vertraut zu machen.
cd greenbone-security-assistant-5.0.4
sudo mkdir source
cd source
sudo cmake ..
sudo make
sudo make install
cd
9. WMI Unterstützung installieren
Damit der OpenVAS Scanner Windows Management Instrumentation (WMI) beherrscht, also der Netzwerkzugriff auf Windows Komponenten wie Software oder Protokolle, muss diese optionale Komponente gesondert installiert werden. Bevor der WMI Client installiert werden kann, muss er auf die aktuelle Version gepatcht werden.
wget http://www.openvas.org/download/wmi/wmi-1.3.14.tar.bz2
wget http://www.openvas.org/download/wmi/openvas-wmi-1.3.14.patch
wget http://www.openvas.org/download/wmi/openvas-wmi-1.3.14.patch2
wget http://www.openvas.org/download/wmi/openvas-wmi-1.3.14.patch3
wget http://www.openvas.org/download/wmi/openvas-wmi-1.3.14.patch4
sudo tar jxf wmi-1.3.14.tar.bz2
sudo cp openvas-wmi-1.3.14.patch wmi-1.3.14
sudo cp openvas-wmi-1.3.14.patch2 wmi-1.3.14
sudo cp openvas-wmi-1.3.14.patch3 wmi-1.3.14
sudo cp openvas-wmi-1.3.14.patch4 wmi-1.3.1
cd wmi-1.3.14
patch -p1 < openvas-wmi-1.3.14.patch
patch -p1 < openvas-wmi-1.3.14.patch2
patch -p1 < openvas-wmi-1.3.14.patch3
patch -p1 < openvas-wmi-1.3.14.patch4
cd Samba/source
sudo ./autogen.sh
sudo ./configure
sudo make proto all "CPP=gcc -E -ffreestanding"
sudo make libraries "CPP=gcc -E -ffreestanding"
sudo bash install-libwmiclient.sh
sudo bash install-libwincmd.sh
cd
Sollten hier Probleme auftreten und im schlechtesten Fall die Installation fehlschlagen, hat dies keinen Effekt auf die grundlegende Funktion von OpenVAS.
Die Installation aller Pakete ist nun beendet und es kann in den nächsten Schritten mit der ersten Konfiguration fortgefahren werden.
OpenVAS 7 konfigurieren
Bevor das nun erfolgreich Installierte OpenVAS verwendet werden kann, sind noch ein paar wenige Konfigurationsschritte notwendig.
10. SSL Zertifikat für OpenVAS erstellen
sudo openvas-mkcert
-------------------------------------------------------------------------------
Creation of the OpenVAS SSL Certificate
-------------------------------------------------------------------------------
This script will now ask you the relevant information to create the SSL certificate of OpenVAS.
Note that this information will *NOT* be sent to anybody (everything stays local), but anyone with the ability to connect to your OpenVAS daemon will be able to retrieve this information.
CA certificate life time in days [1460]:
Server certificate life time in days [365]:
Your country (two letter code) [DE]:
Your state or province name [none]:
Your location (e.g. town) [Berlin]:
Your organization [OpenVAS Users United]:
Congratulations. Your server certificate was properly created.
The following files were created:
. Certification authority:
Certificate = /usr/local/var/lib/openvas/CA/cacert.pem
Private key = /usr/local/var/lib/openvas/private/CA/cakey.pem
. OpenVAS Server :
Certificate = /usr/local/var/lib/openvas/CA/servercert.pem
Private key = /usr/local/var/lib/openvas/private/CA/serverkey.pem
Press [ENTER] to exit
11. Ein Client Zertifikat erstellen
openvas-mkcert-client -n -i
-n Run non-interactively, create certificates and register with the OpenVAS scanner
-i Install client certificates for use with OpenVAS manager
Generating RSA private key, 1024 bit long modulus
............++++++
...........++++++
e is 65537 (0x10001)
You are about to be asked to enter information that will be incorporated
into your certificate request.
What you are about to enter is what is called a Distinguished Name or a DN.
There are quite a few fields but you can leave some blank
For some fields there will be a default value,
If you enter '.', the field will be left blank.
-----
Country Name (2 letter code) [DE]:State or Province Name (full name) [Some-State]:Locality Name (eg, city) []:Organization Name (eg, company) [Internet Widgits Pty Ltd]:Organizational Unit Name (eg, section) []:Common Name (eg, your name or your server's hostname) []:Email Address []:Using configuration from /tmp/openvas-mkcert-client.4751/stdC.cnf
Check that the request matches the signature
Signature ok
The Subject's Distinguished Name is as follows
countryName :PRINTABLE:'DE'
localityName :PRINTABLE:'Berlin'
commonName :PRINTABLE:'om'
Certificate is to be certified until Jan 18 17:57:20 2016 GMT (365 days)
12. Datenbank mit allen Network Vulnerabilty Tests aktualisieren
(Stand April 2014: 35.000 NVTs)
sudo openvas-nvt-sync
13. Die System Libraries aktualisieren
sudo ldconfig
14. Die Zertifikat Datenbank aktualisieren
sudo openvas-certdata-sync
15. Update der Security Content Automation Protokoll Daten (SCAP)
Bei diesem Update ist etwas Geduld gefragt, denn der Vorgang dauert eine ganze Weile.
sudo openvas-scapdata-sync
Die erste Konfiguration des Systems ist nun beendet, im letzten Teil wird die Anwendung gestartet.
OpenVAS starten
16. OpenVAS Scanner starten
sudo openvassd
Kontrolle, ob der Scanner gestartet ist.
netstat -lnp |grep 9391
tcp 0 0 0.0.0.0:9391 0.0.0.0:* LISTEN
17. OpenVAS Manager Datenbank neu aufbauen
Hier ist wieder etwas Geduld gefragt.
sudo openvasmd --rebuild
18. Einen OpenVAS Benutzer anlegen
Damit ein Login möglich ist, muss noch ein Administrator Benutzer angelegt werden.
sudo openvasmd ––create-user=admin ––role=Admin
User created with password ‘xxxxxxxxxxxxxxxxxxxxxxxxxxxxx’
19. OpenVAS Manager starten
Ist der Vorgang beendet kann der Manager gestartet werden.
sudo openvasmd
Kontrolle ob der Manager gestartet ist.
netstat -lnp |grep openvasmd
tcp 0 0 0.0.0.0:9390 0.0.0.0:* LISTEN 3193/openvasmd
tcp 0 0 0.0.0.0:9391 0.0.0.0:* LISTEN 2704/openvassd
20. GSA Oberfläche starten
Im letzten Schritt wird die Oberfläche für OpenVAS aktiviert.
sudo gsad
Auch hier die Probe.
sudo netstat -lnp | grep gsad
tcp 0 0 0.0.0.0:443 0.0.0.0:* LISTEN 3309/gsad
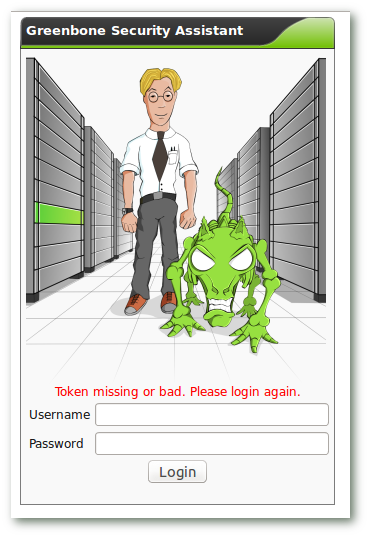
Der Start der Anwendung ist nun abgeschlossen, die Oberfläche sollte unter https://localhost/omp erreichbar sein. Der Login erfolgt mit dem zuvor angelegten Nutzer.

Troubleshooting - Möglicher Fehler - Probleme - Lösungen
Eine Installation ist selten fehlerfrei, darum hier ein paar Tipps und Tricks für mögliche Probleme.
Eine gute Möglichkeit ist es die Installation zu überprüfen. Hierfür steht ein fertiges Script zur Verfügung.
OpenVAS Installation prüfen
wget http://svn.wald.intevation.org/svn/openvas/trunk/tools/openvas-check-setup --no-check-certificate
sudo chmod +x openvas-check-setup
sudo c./openvas-check-setup
openvas-check-setup 2.2.6
Test completeness and readiness of OpenVAS-7
(add '--v4', '--v5', '--v6' or '--v8'
if you want to check for another OpenVAS version)
Please report us any non-detected problems and
help us to improve this check routine:
http://lists.wald.intevation.org/mailman/listinfo/openvas-discuss
Send us the log-file (/tmp/openvas-check-setup.log) to help analyze the problem.
Use the parameter --server to skip checks for client tools
like GSD and OpenVAS-CLI.
Step 1: Checking OpenVAS Scanner ...
OK: OpenVAS Scanner is present in version 4.0.5.
OK: OpenVAS Scanner CA Certificate is present as /usr/local/var/lib/openvas/CA/cacert.pem.
OK: NVT collection in /usr/local/var/lib/openvas/plugins contains 37577 NVTs.
WARNING: Signature checking of NVTs is not enabled in OpenVAS Scanner.
SUGGEST: Enable signature checking (see http://www.openvas.org/trusted-nvts.html).
OK: The NVT cache in /usr/local/var/cache/openvas contains 37577 files for 37577 NVTs.
Step 2: Checking OpenVAS Manager ...
OK: OpenVAS Manager is present in version 5.0.7.
OK: OpenVAS Manager client certificate is present as /usr/local/var/lib/openvas/CA/clientcert.pem.
OK: OpenVAS Manager database found in /usr/local/var/lib/openvas/mgr/tasks.db.
OK: Access rights for the OpenVAS Manager database are correct.
OK: sqlite3 found, extended checks of the OpenVAS Manager installation enabled.
OK: OpenVAS Manager database is at revision 123.
OK: OpenVAS Manager expects database at revision 123.
OK: Database schema is up to date.
OK: OpenVAS Manager database contains information about 37577 NVTs.
OK: OpenVAS SCAP database found in /usr/local/var/lib/openvas/scap-data/scap.db.
OK: OpenVAS CERT database found in /usr/local/var/lib/openvas/cert-data/cert.db.
OK: xsltproc found.
Step 3: Checking user configuration ...
WARNING: Your password policy is empty.
SUGGEST: Edit the /usr/local/etc/openvas/pwpolicy.conf file to set a password policy.
Step 4: Checking Greenbone Security Assistant (GSA) ...
OK: Greenbone Security Assistant is present in version 5.0.4.
Step 5: Checking OpenVAS CLI ...
OK: OpenVAS CLI version 1.3.1.
Step 6: Checking Greenbone Security Desktop (GSD) ...
SKIP: Skipping check for Greenbone Security Desktop.
Step 7: Checking if OpenVAS services are up and running ...
OK: netstat found, extended checks of the OpenVAS services enabled.
OK: OpenVAS Scanner is running and listening on all interfaces.
OK: OpenVAS Scanner is listening on port 9391, which is the default port.
OK: OpenVAS Manager is running and listening on all interfaces.
OK: OpenVAS Manager is listening on port 9390, which is the default port.
OK: Greenbone Security Assistant is running and listening on all interfaces.
OK: Greenbone Security Assistant is listening on port 443, which is the default port.
Step 8: Checking nmap installation ...
./openvas-check-setup: 1: ./openvas-check-setup: nmap: not found
WARNING: Your version of nmap is not fully supported:
SUGGEST: You should install nmap 5.51.
Step 9: Checking presence of optional tools ...
OK: pdflatex found.
OK: PDF generation successful. The PDF report format is likely to work.
OK: ssh-keygen found, LSC credential generation for GNU/Linux targets is likely to work.
OK: rpm found, LSC credential package generation for RPM based targets is likely to work.
OK: alien found, LSC credential package generation for DEB based targets is likely to work.
OK: nsis found, LSC credential package generation for Microsoft Windows targets is likely to work.
It seems like your OpenVAS-7 installation is OK.
Weitere Probleme die bei der Installation auftreten können
Problem
Package libopenvas was not found in the pkg-config search path.
Perhaps you should add the directory containing `libopenvas.pc'
to the PKG_CONFIG_PATH environment variable
No package 'libopenvas' found
Lösung
Die Libraries sind nicht richtig oder noch gar nicht installiert. Siehe Punkt 4.
Problem
main:WARNING: sql_x_internal: sqlite3_prepare failed: no such table: main.meta
Lösung
Der Rebuild Prozess war fehlerhaft oder ist gar nicht gelaufen "sudo openvasmd --rebuild".
Weitere Probleme lassen sich jederzeit über das Kontrollieren der Log Dateien einsehen und bestimmt auch lösen.
Log Pfad
/usr/local/var/log/openvas
Abschließend kann ich nur viel Erfolg bei der Installation und der drauf folgenden Schwachstellensuche wünschen.
Quellen
hackertarget.com
openvas.org
jeroenvda.eu
devconsole.info
Trackbacks
Trackback-URL für diesen EintragDieser Link ist nicht aktiv. Er enthält die Trackback-URI zu diesem Eintrag. Sie können diese URI benutzen, um Ping- und Trackbacks von Ihrem eigenen Blog zu diesem Eintrag zu schicken. Um den Link zu kopieren, klicken Sie ihn mit der rechten Maustaste an und wählen "Verknüpfung kopieren" im Internet Explorer oder "Linkadresse kopieren" in Mozilla/Firefox.
Keine Trackbacks
Die Kommentarfunktion wurde vom Besitzer dieses Blogs in diesem Eintrag deaktiviert.
Kommentare
Ansicht der Kommentare: Linear | VerschachteltNoch keine Kommentare